Thinking about swapping in a 6-speed manual gearbox? It’s a pretty common upgrade, especially if you’re looking to change up how your car drives or maybe squeeze a bit more out of your fuel. Doing a 6-speed manual gearbox replacement can seem like a big job, but with the right info, it’s totally doable. This guide breaks down what you need to know to get that smoother shifting, potentially better MPG experience sorted.
Key Takeaways
- When performing 6-speed manual gearbox replacements, ensure all parts, like the clutch kit and flywheel, are compatible with your specific engine model (e.g., FSI vs. TSI).
- Axles from compatible models (like P12 or Spec V) are necessary, and sometimes hubs need to be redrilled or modified.
- Replacing the slave cylinder/throw-out bearing during the swap is highly recommended to avoid future issues and extra labor.
- While some suggest changing the shifter box and cables, it’s often not strictly necessary for a successful 6-speed manual gearbox replacement.
- Using the correct gear oil, typically 75w90 GL-4, is important, with thicker options like 85w140 potentially beneficial for high-power applications but can affect cold shifting.
Transmission Choices
Alright, so you’re looking to swap in a 6-speed manual, huh? That’s a pretty sweet upgrade. The first big decision you’ll face is picking the right transmission. It’s not just about grabbing any old gearbox; you need one that fits your car and can handle what you throw at it.
There are a few main routes people go. Some folks try to find a 6-speed that was originally offered in their car model, if one even existed. This is usually the easiest path because most of the mounting points and connections will line up pretty well. It means less custom fabrication and fewer headaches trying to get everything to connect. You’re basically just swapping one factory unit for another, albeit a different factory unit.
Then you have the option of using a 6-speed from a completely different vehicle. This is where things get interesting, and potentially more complicated. You might be looking at transmissions from performance models or even aftermarket units designed for swaps. For example, the TREMEC Magnum is a popular choice for those looking to handle serious power. This route often requires custom mounts, driveshaft modifications, and figuring out all the linkage and cable hookups. It gives you more flexibility in terms of finding a transmission that meets specific performance needs, but it definitely takes more planning and work.
Here’s a quick rundown of things to think about when choosing:
- Compatibility: Does it physically fit in your engine bay and connect to your engine? This is the most basic, but often overlooked, step.
- Gear Ratios: Different transmissions have different gear ratios. Some are geared for acceleration, others for highway cruising. Make sure the ratios match your driving style and power goals.
- Durability: How much power can it handle? If you’re planning on making big power or doing track days, you’ll need a transmission that’s built to last. Some factory transmissions, while great for daily driving, can break under hard use with significant horsepower increases.
- Availability and Cost: How easy is it to find the transmission you want, and what’s the price tag? Used transmissions can be a bargain, but sometimes they come with hidden problems.
Choosing the right transmission is like picking the right tool for a job. Get the wrong one, and you’ll be struggling the whole way. Do your homework, figure out what you need, and then find the transmission that fits the bill. It’ll save you a lot of grief down the road.
Ultimately, the best choice depends on your specific car, your budget, and how much work you’re willing to put in. Don’t rush this decision; it’s the foundation for the rest of your 6-speed swap.
Parts Required For The Swap
Alright, so you’ve decided to dive into the world of 6-speed manual gearbox replacements. That’s awesome! But before you get your hands dirty, let’s talk about what you’ll actually need to make this happen. It’s not just about the gearbox itself; there are a bunch of other bits and pieces that play a big role.
Getting the right parts is half the battle, and honestly, it can save you a ton of headaches down the road.
Here’s a rundown of the main components you’ll likely be hunting for:
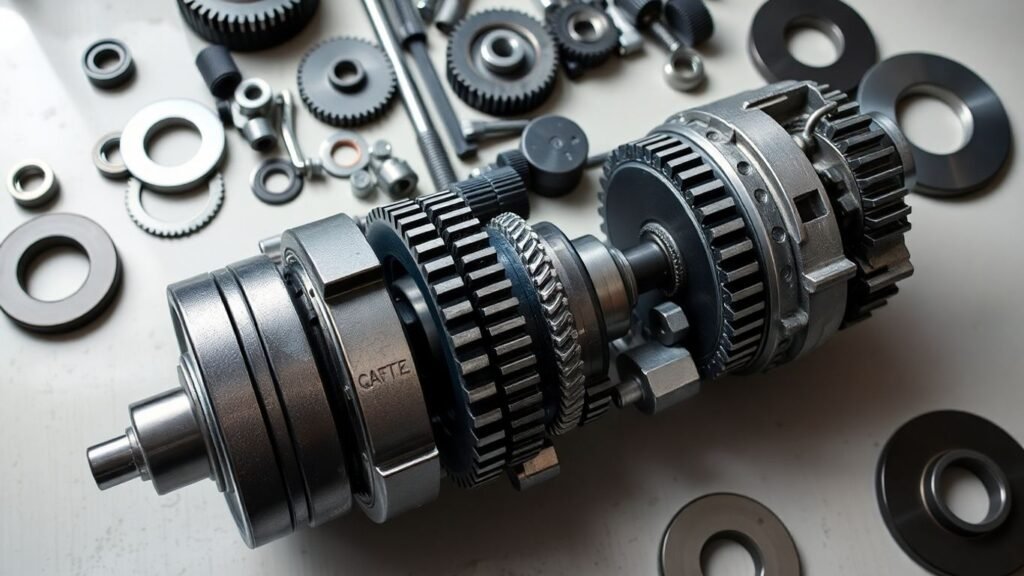
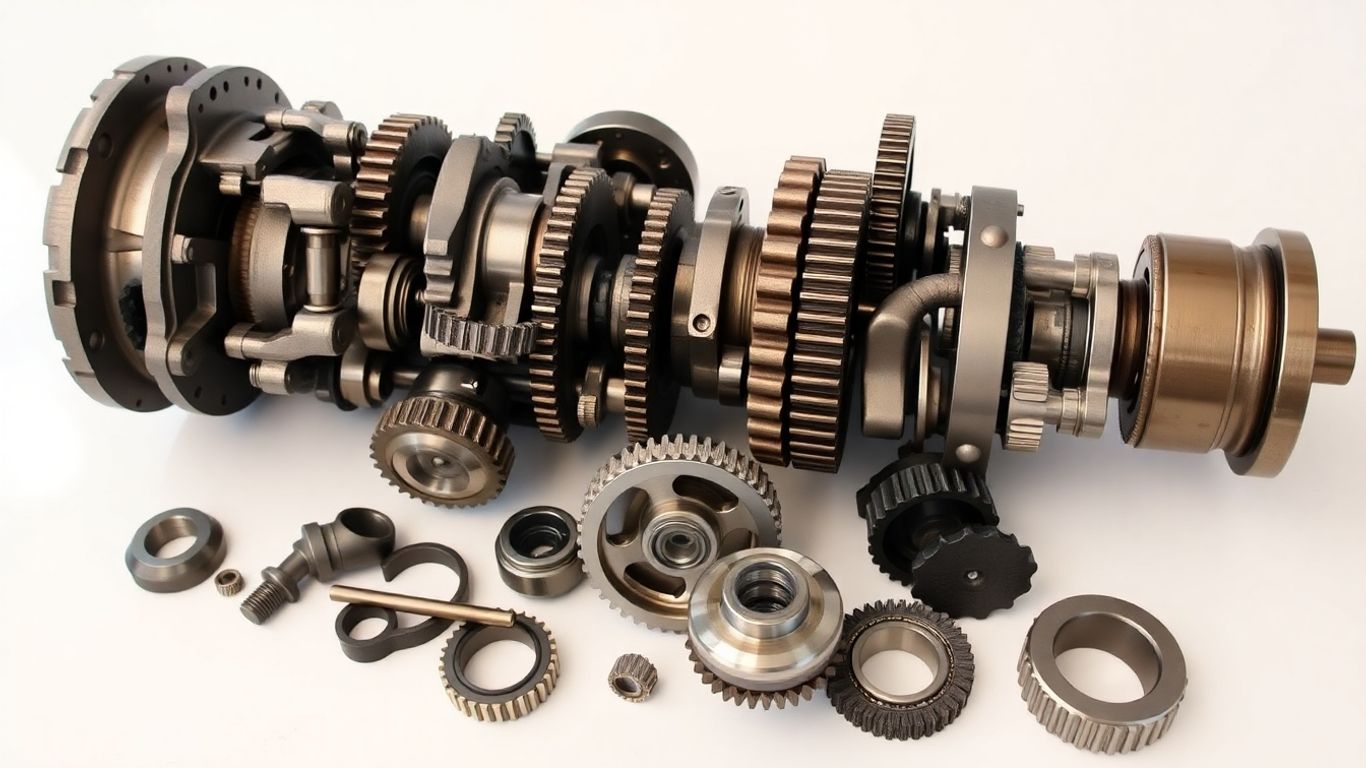
- The 6-Speed Transmission: Obviously, this is the star of the show. Make sure it’s compatible with your specific vehicle model. Sometimes, you might be swapping in a unit from a different car, which brings its own set of considerations.
- Axles: The stock axles might not line up with the new transmission. You’ll often need specific axles designed to work with the 6-speed setup. For example, P12 or 02-06 Spec V axles are commonly mentioned for certain swaps.
- Clutch Kit and Flywheel: Your old clutch and flywheel might not be up to the task, or they might not even bolt up to the new transmission. You’ll typically need a new clutch kit and a compatible flywheel. Make sure to get parts specifically for the engine type you have (like FSI vs. TSI, as they have different bolt patterns).
- Slave Cylinder / Throw-out Bearing: This is part of your clutch actuation system. It’s usually best to replace this when you’re doing a transmission swap, as it’s a wear item and can be tricky to get to later.
- Shifter Cables and Linkages: You’ll need the bits that connect your gear shifter inside the car to the transmission itself. This often includes shifter cable end links and brackets.
- Starter Motor: Depending on the transmission you’re swapping in, you might need a different starter motor to mesh correctly.
- Transmission Mounts/Support: The new transmission might require different mounting points or a specific support bracket.
- Hardware and Fluids: Don’t forget things like flywheel bolts (they’re often shorter than flexplate bolts), clutch alignment tools, and, of course, the correct gear oil for your new transmission.
Trying to reuse old bolts or parts that aren’t quite right can lead to bigger problems. It’s always better to get the specific parts recommended for the swap, even if it seems like overkill at the time. Trust me, future you will thank you.
Sourcing these parts can involve a mix of new aftermarket components, used parts from salvage yards, or even specialized conversion parts. Prices can vary wildly depending on whether you’re buying new or used, and how rare the parts are. Doing your homework on compatibility is key here.
FSI Clutch Kit And Flywheel
Alright, let’s talk about the clutch kit and flywheel for your 6-speed swap. This is where things can get a little specific, especially if you’re going with an FSI setup. You absolutely need to make sure you’re using parts from an FSI engine, not a TSI. The FSI flywheel has six bolts and will fit your engine, while the TSI has eight and just won’t work. It’s a common mistake, so pay attention here.
When you’re looking at clutch kits, you’ve got a few paths. For a basic setup, you might find a used OEM dual-mass flywheel and clutch from a P12. This is usually the cheapest route, costing around $200-$300 used. It’s a direct bolt-on, no grinding needed, but these dual-mass flywheels can get noisy when they’re older and aren’t rated for super high horsepower, maybe around 200 wheel horsepower max. You’ll need to use the longer P12 flywheel bolts with this setup.
If you’re aiming for more power, companies like JWT offer their own 6-speed swap flywheels. These are often lighter aluminum flywheels, like the Gspec Performance one at around $550, which weighs under 12 pounds. These usually use a 225mm clutch kit, similar to what you’d find on a 240SX KA24DE, and can handle significantly more power, up to 600-650 wheel horsepower with the right clutch. Just be aware that some earlier versions might have needed some grinding to clear the bellhousing, so check with the manufacturer.
Another option is the S15 flywheel and clutch setup. This is a 240mm clutch, and you can often find RWD SR20DET clutch kits that work. The catch here is that the pressure plate might stick out a bit, requiring you to grind down the starter area on the bellhousing or have the flywheel and pressure plate machined. Some people have also used Maxima clutch kits, but they often require even more grinding.
For those looking for serious holding power, a twin-disk clutch setup is available. These are custom-designed and can handle pretty much anything you throw at them, often costing around $1250. They’re usually fully balanced and can handle very high RPMs.
Regardless of the kit you choose, remember that flywheel bolts are single-use. Always get new ones. When installing the flywheel, make sure to position it correctly on the crankshaft and tighten the bolts in a star pattern with progressive torque. It’s a good idea to use a clutch alignment tool to make sure everything lines up perfectly before you bolt on the pressure plate.
Choosing the right clutch and flywheel combo is all about matching your power goals with your budget and willingness to do some modifications. Don’t skimp here; a good clutch setup is key to a reliable swap.
Axles
Alright, let’s talk about the axles. This is where things can get a little different depending on what car you’re starting with and what you’re aiming for. If you’re coming from a B13 or B14 chassis, you’ll notice the axles, hubs, and CV joints are generally beefier on the donor transmission’s side. They’re built to handle more power, which is a good thing.
The main thing to figure out is how to connect your existing setup to these new, larger axles.
Here are a couple of common ways people tackle this:
- Resplining Your Existing Hubs: This is often the most budget-friendly route. You can send your current hubs (preferably new ones, but used can work if they’re cleaned up) to a place like The Driveshaft Shop. They can machine them to match the spline size of the Spec V axles. It’s usually a quick turnaround, and you get to keep your current brake and knuckle setup. This is great if you want to run smaller wheels, like 13-inch drag wheels, which won’t clear the stock B15 brakes.
- Swapping to the Donor Hub, Knuckle, and Brake Assembly: This is a more involved, and usually more expensive, option. You’d swap over the entire hub, knuckle, and brake setup from the donor car (like a B15 Spec V). Keep in mind that this often changes your bolt pattern (e.g., from 4×100 to 4×114.3), so you might need new wheels or have your hubs redrilled. This route can also affect your steering alignment, so an alignment afterward is a good idea.
There’s a potential issue some folks have run into, especially with very low cars and high horsepower, where the driver’s side axle might be a bit too long. This can cause binding in the CV joints, leading to them snapping. A fix for this involves swapping the inner midshaft from your old axle onto the new one. It uses the same spline size and shortens things up, giving you that needed compression room.
If you’re going with the hub and knuckle swap, you’ll likely be looking at the P12 or ’02-’06 Spec V axles. You can find these used for a decent price, or buy them new aftermarket. Trying to mix and match outer joints from different axles can be a real headache, so sticking to a matched set or getting them professionally modified is usually the way to go.
Slave Cylinder / Throw-out Bearing
Alright, let’s talk about the slave cylinder and throw-out bearing. This is the part that actually makes the clutch disengage when you press the pedal. Think of it as the messenger between your foot and the clutch itself.
There are a couple of ways this can work. You’ve got the older style, which uses a clutch fork and an external slave cylinder. The slave cylinder pushes on the fork, and the fork then pushes on the throw-out bearing. The throw-out bearing is the guy that actually contacts the clutch pressure plate to release the clutch.
Then there’s the more modern approach: the internal slave cylinder, which is also the throw-out bearing. This setup gets rid of the clutch fork altogether. The slave cylinder is built right into the bearing unit, and it presses directly onto the pressure plate. This is often found in newer transmissions and can sometimes make for a cleaner install.
When you’re swapping in a 6-speed, you’ll need to make sure you get the correct slave cylinder and throw-out bearing that matches your new transmission. Sometimes, a kit will include one, but it’s always good to double-check. If you’re going hydraulic, you won’t need any of the old cable-actuated parts.
Here’s a quick rundown:
- External Slave Cylinder: Pushes a clutch fork, which then actuates the throw-out bearing.
- Internal Slave Cylinder / Throw-out Bearing: A combined unit that presses directly onto the pressure plate, eliminating the clutch fork.
- Compatibility: Always match the slave cylinder and throw-out bearing to your specific 6-speed transmission.
Getting this part wrong can lead to a clutch that won’t disengage properly, or worse, won’t work at all. It’s a pretty direct link to how your clutch pedal feels and functions, so don’t skimp on making sure it’s the right one for the job.
Shifter Cable End Links
Alright, so you’ve got your new 6-speed transmission ready to go, but how are you going to connect it to the shifter inside your car? That’s where the shifter cables and their end links come into play. These aren’t just simple wires; they’re pretty important for getting your shifts to feel right.
When you swap to a 6-speed, you’re ditching the old rod-style shifter setup for a cable-actuated one. This means you’ll need a new shifter box that sits inside the car and cables that run all the way to the transmission. You’ll want to make sure you grab the correct bracket that bolts to the transmission to hold these cables, often coming with the donor transmission or available as a kit. The Spec V or Altima shifter assemblies are common choices here, and while they might look a bit different, they generally fit up well.
Getting the cables routed correctly is key to a smooth shifting experience. You’ll typically route them up between the subframe and the firewall. Once they’re connected to the transmission bracket, you might need to make some adjustments. If shifting feels stiff, especially into gears on the sides (like 1st, 2nd, 5th, and 6th), it usually means the cable controlling the up-down motion needs a tweak. If it’s tough to get into gears that are more directly in front or back, it’s the other cable. You don’t want to slide the cable ends all the way in; leave a little room to play with. It’s a bit of trial and error, but you can usually get it feeling pretty good. Don’t force anything, though; these parts can be delicate.
You might find that some shifter cable end link kits are available to fix common issues, like slippage. For example, there are specific bushing kits designed to keep things tight and prevent slop.
If you’re having trouble getting into gear, don’t immediately assume the transmission is the problem. Often, it’s just a matter of adjusting the shifter cable length. You’re looking for a balance where every gear engages cleanly without feeling forced. It’s a small detail, but it makes a big difference in how the car feels to drive.
The Shifter Box
Alright, let’s talk about the shifter box. This is the part inside the car that you actually interact with when you’re changing gears. When you’re swapping in a 6-speed transmission, you’ll notice it uses a cable-actuated system, which is different from older setups that might have used rods. The shifter box itself is basically a solid unit that sits inside the cabin, and it connects to the transmission via those cables we talked about.
You’ve got a few options when it comes to shifter assemblies. Some people go with the Spec V setup, which is known for being a bit more low-profile. Another route is using a shifter assembly from a 5-speed QR25 Altima. It might not be as sleek out of the box, but you can often trim it down to fit better. Then there’s the Maxima shifter assembly, which can also work but might need a bit more modification. Honestly, the Spec V or Altima options are usually the way to go.
Here’s a quick rundown of what to consider:
- Spec V Shifter Assembly: Generally a good, low-profile choice. Installation is pretty similar to other options.
- 5-Speed Altima Shifter Assembly: Works well, and you can modify it for a cleaner look. The rear mounting points often line up nicely.
- Maxima Shifter Assembly: Can be a bit bulkier and might require more trimming to get it to fit right.
When you’re installing it, the shifter box usually fits right into the opening of your old shifter. You can mount it inside the car, which is the standard way, or some folks get creative and fabricate custom brackets to mount it in the transmission tunnel. Just make sure you route those cables properly, usually up between the subframe and the firewall, and secure them to the transmission bracket with the provided clips. It’s not overly complicated, but taking your time here will save you headaches later.
Don’t forget to check the shifter cable adjustment after everything is connected. Sometimes, you might find it a little stiff going into certain gears. You can usually fix this by making small adjustments to the cable length. It’s all about finding that sweet spot where every gear engages smoothly without feeling forced.
Gear Oil Recommendation
Alright, let’s talk about what kind of juice to put in your new 6-speed. The factory usually calls for a 75W-90 gear oil, and often it’s a GL-4 spec. That’s a good starting point for most folks.
But, if you’re planning on really pushing your car, maybe you’ve got over 500 horsepower, or you just want to give your transmission a little extra protection, you might want to consider something a bit thicker. For those situations, a 85W-140 conventional or synthetic blend gear oil can be a solid choice. This heavier oil can really help things shift smoothly once it’s warmed up and might even help your gears and bearings last longer under stress. Just keep in mind, if you live somewhere super cold, that thicker oil can make for some grumpy shifting when it’s freezing outside, especially on those first few blocks.
Here’s a quick rundown of what to think about:
- Standard Use: Stick with a 75W-90, likely GL-4. It’s what the manual says and works well for daily driving.
- High Horsepower/Heavy Use: Consider an 85W-140 (conventional or synthetic blend) for warmer months. It offers better protection when things get hot and tough.
- Cold Climates: If you’re in a really cold area, you might want to stick with a 75W-90 synthetic year-round, or even switch back to it during winter if you go with the 85W-140.
Some people have found that using a really thick oil like 85W-140 can make initial shifts feel a bit stiff when the transmission is cold. It’s a trade-off: super smooth when warm, a little clunky when cold. So, you’ve got to decide what works best for your driving conditions and your tolerance for those first few chilly shifts.
Speedometer Cable Drive / Speed Sensor
Alright, so you’ve got your new six-speed transmission bolted in, and you’re thinking, ‘What about my speedometer?’ It’s a common question, especially when you’re swapping in a transmission that might not have come from the exact same car your original one did.
For newer cars that already have an electric speedometer, you’re usually in luck. Many of these transmissions, like the Spec V or P12, come with an electric speedo that’ll hook right up. But if you’re in an older ride, say ’92 or earlier, and you’ve got that old-school cable-driven speedometer, you’ll need to make a change. The good news is, you can often swap the speedometer cable drive or speed sensor over to your new six-speed. It’s not a super complicated job, but you do need to pay attention to a couple of things.
Here’s the rundown:
- Sensor Rotation: You’ll likely need to rotate the sensor clockwise more than its usual spot to get it to sit right in the transmission. This often means you’ll have to trim off a little tab that gets in the way of the securing bolt.
- Installation: Once it’s rotated, carefully push it in until you feel it seat against something. That’s usually the sweet spot.
- Securing: You can typically use the original bolt, maybe with a wider washer, to hold it in place. It might feel a little different than stock, but if it’s snug and the speedometer works, you’re golden.
This adapter is necessary for Tremec T-56 Magnum, TKX, and TKO transmissions, as they utilize a Ford speedometer drive. Without this adapter, a custom speedometer cable would be required. It’s one of those little details that can save you a big headache down the road.
Don’t forget to double-check the compatibility of your specific transmission and vehicle. Sometimes, even with adapters, there can be minor fitment quirks. It’s always better to be prepared and have a plan B, just in case.
Flywheel
Alright, let’s talk about the flywheel. This is the part that bolts directly to your engine’s crankshaft and basically acts as a buffer between the engine and the transmission. It’s also where the clutch disc grabs onto to transfer power. When you’re swapping to a 6-speed, the flywheel choice can get a little tricky, and there are a few ways to go about it.
You’ll need to make sure the flywheel you choose is compatible with both your engine and the clutch kit you plan to use. This sounds obvious, but trust me, it’s easy to overlook.
Here are some common options you might run into:
- OEM P12 Dual Mass Flywheel: This is often the most budget-friendly route if you can find one used. It bolts up without needing any modifications, which is a big plus. However, these can be pretty heavy, and older ones might develop some annoying noises. They’re generally good for around 200 horsepower.
- Gspec Performance Aluminum Flywheel: This is a lighter, aftermarket option. It’s designed to work with a 240sx KA24DE clutch kit, which gives you a lot of flexibility for higher horsepower applications, potentially up to 650hp with the right clutch. Some earlier versions might have needed minor grinding to clear the bellhousing, but newer ones should be sorted.
- JWT 6-Speed Swap Flywheel: Another aftermarket choice, this one can also handle larger clutch sizes (like from a 350z or S15), giving you serious holding power for high-HP builds. Like the Gspec, some earlier versions might have required some grinding for clearance.
- S15 Flywheel/Clutch Setup: This is an option that uses parts from an S15 Silvia. You’ll likely need to do some grinding on the bellhousing or have the flywheel and pressure plate machined down to make it fit properly. You can use an RWD SR20DET clutch with this, which is a 240mm setup.
- Competition Clutch Twin Disc: If you’re aiming for serious power and want a robust setup, a twin-disc clutch and flywheel combo is the way to go. These are custom-designed and can handle pretty much anything you throw at them. They’re more expensive but offer excellent performance and durability.
When you’re looking at flywheel bolts, don’t reuse the old ones. They can get stretched from heat and lose their strength, which is definitely not something you want happening down the road. Always use new ones.
Remember to check the specific requirements for whichever flywheel and clutch combination you decide on. Getting this part right is key to a smooth and reliable transmission swap.
Wrapping Up Your 6-Speed Swap
So, you’ve looked into swapping in a 6-speed manual gearbox. It’s definitely not a small job, and as we’ve seen, there are a lot of little things that can pop up. From making sure you have all the right parts, like the clutch, flywheel, and even the right pedal assembly, to dealing with potential issues like a worn-out throw-out bearing or needing to grind down a part of the transmission itself, it’s a project that requires careful planning. While some folks might find it doesn’t offer huge fuel savings, the improved driving feel and performance can be a big win. If you’re up for the challenge and do your homework, a 6-speed swap can really change how your car feels on the road. Just remember to double-check everything, consult your manual, and maybe have a friend handy – it’s always better to be safe than sorry when you’re deep into a project like this.
Frequently Asked Questions
What’s the main reason people swap to a 6-speed manual transmission?
Many people swap to a 6-speed manual transmission because they want their car to feel faster and more responsive, especially when accelerating from a stop or at lower speeds. While some hope for better gas mileage, the reality is that the fuel economy often stays about the same as a 5-speed.
What are the biggest challenges when swapping to a 6-speed manual?
One of the trickiest parts is making sure all the new components fit correctly. Sometimes, the 6-speed transmission is a bit taller than the old one, and you might need to slightly shave down part of the transmission housing so it doesn’t hit the engine’s timing cover. This is important to prevent oil leaks.
Do I need to replace my clutch and flywheel when doing this swap?
Yes, you’ll almost always need a new clutch kit and flywheel. It’s crucial to get parts specifically designed for the engine your car has (like an FSI engine). Using parts meant for a different engine, like a TSI, won’t work because they have different bolt patterns.
Can I use parts from my old automatic transmission when installing a manual one?
Generally, no. If you’re swapping from an automatic to a manual, you’ll need many specific manual transmission parts. This includes things like a new clutch, flywheel, pedal assembly (even the brake pedal might need changing), and the transmission itself. The flexplate from the automatic also needs to be replaced with a flywheel.
What kind of gear oil should I use in a 6-speed manual transmission?
The manufacturer usually recommends a 75w90 gear oil, often a GL-4 type. For cars that are driven hard or have a lot of power, some people suggest using a thicker oil like 85w140, especially in warmer weather, as it can help the transmission shift smoother when warm and handle more stress. However, this thick oil can be hard to shift in very cold temperatures.
Is it a good idea to change other parts while doing a transmission swap?
Absolutely! Since you’ll already have many parts removed, it’s a perfect time to upgrade other things. You could install a short-throw shifter for quicker gear changes, a new exhaust system, or even consider changing the engine if it’s old. Doing these extras now saves you from having to take things apart again later.